Create and Manage LMS Course Catalogs
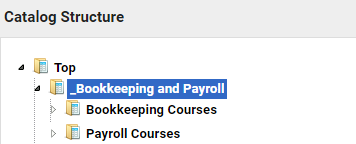
In Catalog List Maintenance, you can create, organize and configure the course catalogs by adding folders and sub-folders to represent catalogs and sub-catalogs. The page contains a default "Top" catalog. A catalog added directly under the "Top" catalog is considered a first-level catalog. Catalogs added below first-level catalogs are considered sub-level catalogs.
In the example below, Bookkeeping and Payroll indicates the first-level catalog while Bookkeeping Courses and Payroll Courses represent the sub-catalogs.
To add and configure course catalogs, your user role must have unrestricted access to the Catalog Manager Features in System Roles (Manage Features > Catalog Manager Features).
Add a Catalog
To add a catalog
- Go to Manage Center > Learning > Catalog General Settings > Catalog List Maintenance.
- Browse to the appropriate catalog and right-click it, or right-click Top to add a first-level catalog.
- Select Add Catalog as a Child.
- The Add Catalog as Child page opens, where you can configure the new catalog properties. For detailed information about the catalog property fields, please see Catalog Properties Field Reference.
- Click Save.
Clone a Catalog
You can make an exact copy of a catalog using the Clone feature. For example, you may want to make a copy of a catalog to update its courses for a new year. You can clone the current catalog and update the course sessions and schedules.
To clone a catalog
- Go to Manage Center > Learning > Catalog General Settings > Catalog List Maintenance.
- Browse to the catalog you would like to clone.
- Right-click and select Clone.
- Click the To Target Catalog: field browse button and select the catalog in which to place the new catalog. If you are creating a first-level catalog, be sure to place it in the "Top" catalog.
- The Include course content? field is selected by default. This will copy the original content to the new catalog. Clear the checkbox if you don't want the content included.
- The Keep existing permissions? field is selected by default. This will copy the original permissions to the new catalog. Clear the checkbox if you don't want the permissions copied.
- The Additionally, grant permissions as defined it parent field determines if a sub-catalog will inherit the parent permissions. Choose an option for the new catalog:
- As defined in original - will automatically set the field to the value in the cloned catalog.
- Disabled - disables the field.
- Enabled - enables the field.
- Click Save.
Set or Edit the Catalog Permissions
Once you have saved a new catalog you can set the access permissions. Users can have read-only or unrestricted access to the catalog.
To configure catalog permissions
- Go to Manage Center > Learning > Catalog General Settings > Catalog List Maintenance.
- Browse to locate the catalog you would like to edit. Right-click and select Edit Catalog Properties.
- Click the Permissions button.
- Set the permissions as required.
Edit Catalog Properties
To edit a catalog's properties:
- Go to Manage Center > Learning > Catalog General Settings > Catalog List Maintenance.
- Browse to locate the catalog you would like to edit. Right-click and select Edit Catalog Properties.
Edit Catalog Content
Although courses are assigned to a catalog at the Learning Module level, catalog administrators can remove them from a catalog in Catalog List Maintenance.
To edit a catalog's content
- Go to Manage Center > Learning > Catalog General Settings > Catalog List Maintenance.
- Browse to locate the catalog you would like to edit. Right-click and select Edit Catalog Content.
- Select the check boxes of the courses you want to remove from the catalog.
- Click Save. The course is removed from the catalog and the window closes.
Move a Catalog
You can move a catalog from its parent catalog to another in the catalog structure, thus moving where it is shown in the Catalog Browser.
To move a catalog
- Go to Manage Center > Learning > Catalog General Settings > Catalog List Maintenance.
- Browse to locate the catalog you would like to move. Right-click and select Move.
- Click the To Target Catalog: field browse button and select the catalog to which to move the catalog. If you moving the catalog to be a first-level, be sure to place it in the "Top" catalog.
- The Include course content? field is selected by default. This will move the original content to along with the catalog. Clear the checkbox if you don't want the content moved.
- The Keep existing permissions? field is selected by default. This will move the original permissions along with the catalog. Clear the checkbox if you don't want the permissions moved.
- The Additionally, grant permissions as defined it parent field determines if a sub-catalog will inherit the parent permissions. Choose an option:
- As defined in original - will automatically set the field to the value to the value in the new parent.
- Disabled - disables the field.
- Enabled - enables the field.
- Click Save.
Delete a Catalog
When you delete a catalog, courses that were assigned to it in the Catalog Editor are no longer assigned to it.
To delete a catalog
- Go to Manage Center > Learning > Catalog General Settings > Catalog List Maintenance.
- Browse to locate the catalog you would like to delete. Right-click and select Delete.
- Confirm the deletion.
Assign Random Images to LMS Catalogs
You can assign library stock images randomly to catalogs and courses that have no images assigned to them. The library images are supplied with the LMS. This can be useful for testing, demos and quickly populating large collections of courses and catalogs. Items with images already assigned are not affected.
To assign library pictures randomly
- Go to Manage Center > Learning > Catalog General Settings > Catalog List Maintenance.
- Scroll to the bottom of the page and click Assign Random Images. You are asked to confirm this action. The number of items assigned an image is shown briefly at the top of the page.